升级 Prisma ORM 层 (MySQL)
概述
本页解释了升级过程的第一步:获取您的 Prisma 1 配置并将其升级到 Prisma ORM 2。具体来说,您将学习如何
- 添加 Prisma ORM 2 CLI 作为开发依赖
- 创建您的 Prisma ORM 2 模式
- 确定您的连接 URL 并连接到数据库
- 内省您的数据库(到目前为止由 Prisma 1 管理)
- 使用 Prisma 1 升级 CLI 解决新 Prisma ORM 2 数据模型中的 模式不兼容性
- 安装并生成 Prisma Client
完成这些步骤后,您可以继续阅读下一份指南,其中解释了如何升级应用程序层以使用 Prisma Client 进行数据库查询。
注意:在升级过程中,获取数据库的图形视图会很有帮助。因此,建议使用图形数据库客户端连接到您的数据库,例如 TablePlus 或 Postico。
1. 安装 Prisma ORM 2 CLI
Prisma ORM 2 CLI 可通过 npm 上的 prisma 包获取,并通过 prisma 命令调用。
请注意,Prisma 1 的前 prisma 命令已重命名为 prisma1。您可以在此处了解更多信息。
您可以在 Node.js 项目中安装 Prisma ORM 2 CLI,如下所示(请务必在 package.json 所在的目录中调用此命令)
npm install prisma --save-dev
注意:对于 Prisma 1,通常建议全局安装 CLI。我们现在建议本地安装 Prisma CLI 以防止版本冲突。
您现在可以通过添加 npx 前缀来使用 prisma CLI 的本地安装
npx prisma
如果您一次性升级整个项目,您现在也可以卸载 Prisma 1 CLI(否则请展开下面)
# remove global installation
npm uninstall -g prisma1

# remove local installation
npm uninstall prisma1
如果您想继续并排使用 Prisma 1 CLI,请展开
如果您想继续使用 Prisma 1 CLI,建议删除其全局安装并添加 prisma1 CLI 作为开发依赖
# installs v1.34 of the Prisma 1 CLI
npm uninstall -g prisma
npm install prisma1 --save-dev
您现在可以如下调用它
npx prisma1
请注意,如果您需要小于 1.34 的 CLI 版本(例如 1.30),您可以如下安装
# installs v1.30 of the Prisma 1 CLI
npm uninstall -g prisma@1.30
npm install prisma@1.30 --save-dev
您现在可以如下调用它
npx prisma
2. 创建您的 Prisma ORM 2 模式
对于本指南,您将首先使用 prisma init 命令创建一个新的 Prisma 模式,然后使用内省“填充”数据模型。
运行以下命令创建您的 Prisma 模式(请注意,如果您已经有一个名为 prisma 的文件夹,这将抛出错误)
npx prisma init
如果您看到以下错误,您需要重命名当前的 prisma 目录
ERROR  A folder called prisma already exists in your project.
       Please try again in a project that is not yet using Prisma.
您可以将当前的 prisma 目录重命名为 prisma1,以明确表示它包含以前的 Prisma 1 配置
mv prisma prisma1
现在您可以运行 init,它将成功
npx prisma init
它应该打印以下输出
✔ Your Prisma schema was created at prisma/schema.prisma.
  You can now open it in your favorite editor.

Next steps:
1. Set the `DATABASE_URL` in the `.env` file to point to your existing database. If your database has no tables yet, read https://pris.ly/d/getting-started
2. Set the `provider` of your `datasource` block in `schema.prisma` to match your database: `postgresql`, `mysql` or `sqlite`.
3. Run `prisma db pull` to turn your database schema into a Prisma data model.
4. Run `prisma generate` to install Prisma Client. You can then start querying your database.

More information in our documentation:
https://pris.ly/d/getting-started
该命令创建了一个名为 prisma 的新文件夹和两个文件
prisma/schema.prisma:您的 Prisma 模式,指定了数据源、生成器和数据模型(请注意,数据模型尚不存在,它将通过内省生成)。.env:一个 dotenv 文件,用于配置您的数据库连接 URL。
您的初始 Prisma 模式如下所示
// This is your Prisma schema file,
// learn more about it in the docs: https://pris.ly/d/prisma-schema

datasource db {
  provider = "mysql"
  url      = env("DATABASE_URL")
}

generator client {
  provider = "prisma-client-js"
}
在 Prisma 1 中,您在 prisma.yml 中指定要使用的 Prisma Client 的语言变体。在 Prisma ORM 2 中,此信息现在通过 generator 块在 Prisma 模式中指定。
注意:与 Prisma 1 不同,Prisma Client 2.0 的 TypeScript 和 JavaScript 变体使用相同的生成器,称为
prisma-client-js。生成的类型在index.d.ts中始终包含,即使在纯 JavaScript 项目中也是如此。这使得即使不使用 TypeScript,也能在 VS Code 中实现自动完成等功能。
3. 确定您的连接 URL 并连接到数据库
在 Prisma 1 中,数据库连接在用于启动 Prisma ORM 服务器的 Docker Compose 文件中配置。Prisma ORM 服务器然后通过 HTTP 暴露一个 GraphQL 端点,该端点代理来自 Prisma Client 应用程序代码的所有数据库请求。该 HTTP 端点在您的 prisma.yml 中指定。
在 Prisma ORM 2 中,HTTP 层不再暴露,Prisma Client 2.0 配置为“直接”对数据库运行请求(也就是说,请求由 Prisma ORM 的查询引擎代理,但不再有额外的服务器)。
因此,下一步您需要告诉 Prisma ORM 2 您使用了哪种数据库(MySQL 或 PostgreSQL)以及它位于何处。
首先,您需要确保 schema.prisma 中 datasource 块上的 provider 字段配置为使用正确的数据库
- 如果您正在使用 PostgreSQL,它需要在
provider字段中定义值"postgresql"。 - 如果您正在使用 MySQL,它需要在
provider字段中定义值"mysql"。
在代码块中切换选项卡以查看两者的示例
- PostgreSQL
- MySQL
datasource db {
  provider = "postgresql"
  url      = env("DATABASE_URL")
}
datasource db {
  provider = "mysql"
  url      = env("DATABASE_URL")
}
设置 provider 字段后,您可以继续配置 .env 文件中的连接 URL。
假设您的 Docker Compose 文件中用于部署 Prisma ORM 服务器的数据库配置如下所示
PRISMA_CONFIG: |
  port: 4466
  databases:
    default:
      connector: mysql
      host: mysql
      port: 3306
      user: root
      password: randompassword
还假设您的 prisma.yml 中的 endpoint 配置如下所示
endpoint: http://:4466/myproject/dev
根据这些连接详细信息,您需要将 .env 文件中的 DATABASE_URL 环境变量配置如下
DATABASE_URL="mysql://root:randompassword@localhost:3306/myproject@dev"
请注意,连接 URL 中的数据库名称通常由您的服务名称和服务阶段(它们是 prisma.yml 中 endpoint 的一部分)组成,并由 @ 字符分隔。
有时 prisma.yml 中没有指定服务名称和阶段
endpoint: http://:4466/
在这种情况下,数据库名称必须指定如下
DATABASE_URL="mysql://root:randompassword@localhost:3306/default@default"
在连接 URL 页面了解更多信息。
4. 内省您的数据库
出于本指南的目的,我们将使用以下 Prisma 1 数据模型(选择下面的 SQL 选项卡以查看数据模型在 SQL 中映射到什么)
- Prisma 1 数据模型
- SQL
type User {
  id: ID! @id
  email: String @unique
  name: String!
  role: Role! @default(value: CUSTOMER)
  jsonData: Json
  profile: Profile
  posts: [Post!]!
}

type Post {
  id: ID! @id
  createdAt: DateTime! @createdAt
  updatedAt: DateTime! @updatedAt
  title: String!
  content: String
  published: Boolean! @default(value: false)
  author: User @relation(link: TABLE)
  categories: [Category!]!
}

type Profile {
  id: ID! @id
  bio: String
  user: User! @relation(link: INLINE)
}

type Category {
  id: ID! @id
  name: String!
  posts: [Post!]!
}

enum Role {
  ADMIN
  CUSTOMER
}
CREATE TABLE"User" (
    id character varying(25) PRIMARY KEY,
    email text,
    name text NOT NULL,
    role text NOT NULL,
    "jsonData" text
);
CREATE UNIQUE INDEX "User_pkey" ON"User"(id text_ops);
CREATE UNIQUE INDEX "default$default.User.email._UNIQUE" ON"User"(email text_ops);

CREATE TABLE"Post" (
    id character varying(25) PRIMARY KEY,
    title text NOT NULL,
    published boolean NOT NULL,
    "createdAt" timestamp(3) without time zone NOT NULL,
    "updatedAt" timestamp(3) without time zone NOT NULL,
    content text
);
CREATE UNIQUE INDEX "Post_pkey" ON"Post"(id text_ops);

CREATE TABLE"Profile" (
    id character varying(25) PRIMARY KEY,
    bio text,
    user character varying(25) REFERENCES"User"(id) ON DELETE SET NULL
);
CREATE UNIQUE INDEX "Profile_pkey" ON"Profile"(id text_ops);

CREATE TABLE"Category" (
    id character varying(25) PRIMARY KEY,
    name text NOT NULL
);
CREATE UNIQUE INDEX "Category_pkey" ON"Category"(id text_ops);

CREATE TABLE"_PostToUser" (
    "A" character varying(25) NOT NULL REFERENCES"Post"(id) ON DELETE CASCADE,
    "B" character varying(25) NOT NULL REFERENCES"User"(id) ON DELETE CASCADE
);
CREATE UNIQUE INDEX "_PostToUser_AB_unique" ON"_PostToUser"("A" text_ops,"B" text_ops);
CREATE INDEX "_PostToUser_B" ON"_PostToUser"("B" text_ops);

CREATE TABLE"_CategoryToPost" (
    "A" character varying(25) NOT NULL REFERENCES"Category"(id) ON DELETE CASCADE,
    "B" character varying(25) NOT NULL REFERENCES"Post"(id) ON DELETE CASCADE
);
CREATE UNIQUE INDEX "_CategoryToPost_AB_unique" ON"_CategoryToPost"("A" text_ops,"B" text_ops);
CREATE INDEX "_CategoryToPost_B" ON"_CategoryToPost"("B" text_ops);
请注意,此数据模型有三个关系
- 1-1:
User↔Profile - 1-n:
User↔Post(通过_PostToUser关系表维护) - m-n:
Post↔Category(通过_CategoryToPost关系表维护)
现在,您可以使用以下命令对数据库运行 Prisma ORM 的内省
npx prisma db pull
以下是调用 db pull 时发生情况的图形说明
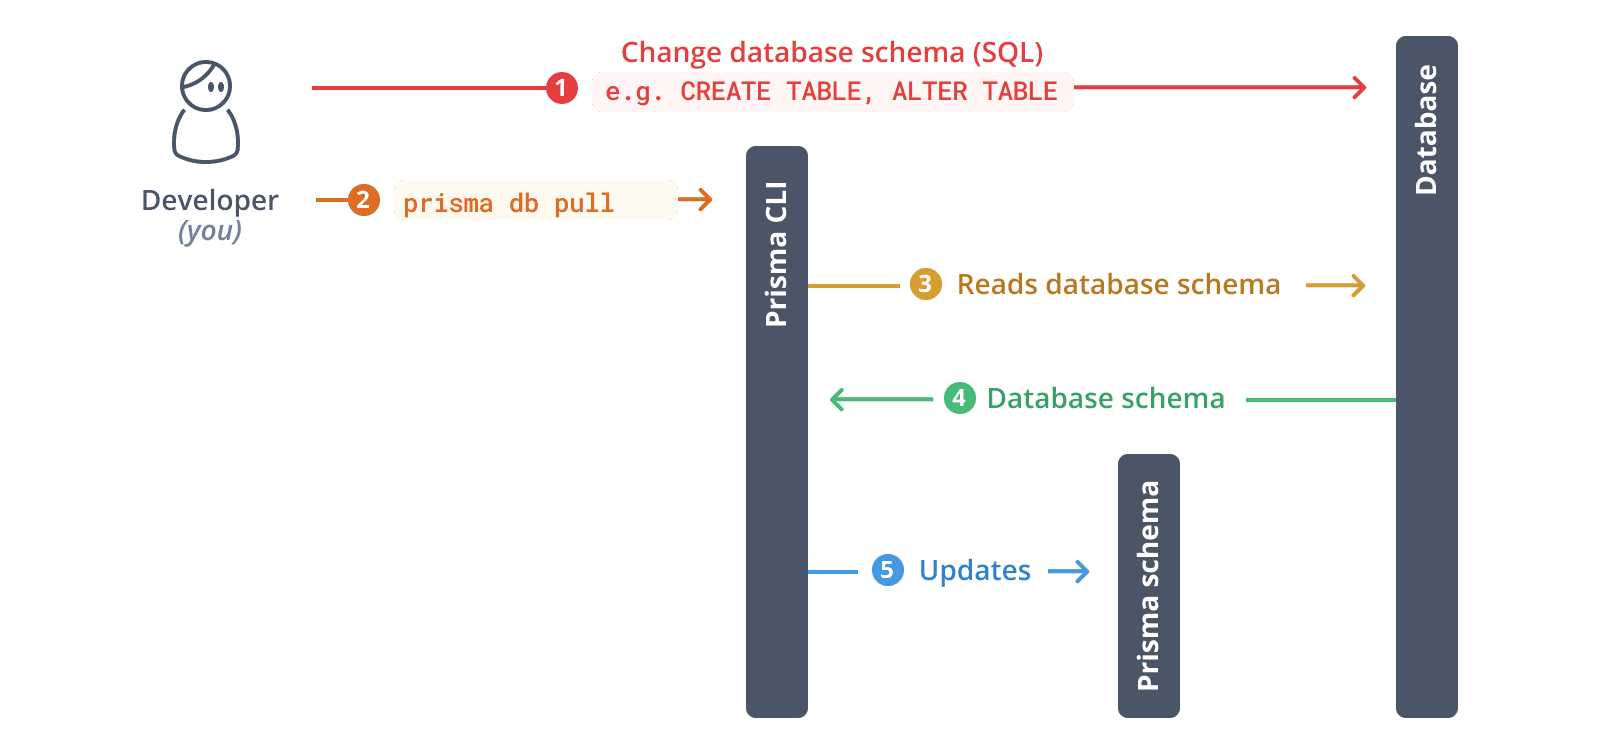
对于上述 Prisma 1 数据模型,这将生成以下 Prisma ORM 2 模式(请注意,模型已重新排序以匹配 Prisma 1 数据模型的初始顺序)
model User {
  id       String    @id @default(cuid())
  email    String?   @unique
  name     String
  role     String
  jsonData String?
  Profile  Profile[]
  Post     Post[]
}

model Post {
  id        String     @id @default(cuid())
  createdAt DateTime
  updatedAt DateTime
  title     String
  content   String?
  published Boolean
  Category  Category[]
  User      User[]
}

model Profile {
  id   String  @id @default(cuid())
  bio  String?
  user String? @unique
  User User?   @relation(fields: [user], references: [id])
}

model Category {
  id   String @id @default(cuid())
  name String
  Post Post[]
}
虽然这已经是一个有效的 Prisma ORM 2 模式,但它缺少一些在其 Prisma 1 等效项中存在的功能
Post上的createdAt和updatedAt字段没有自动生成的日期值User上的role字段没有默认值Post上的published字段没有默认值
此外,还有一些不一致之处,导致 Prisma Client API 不够惯用/符合人体工程学
User↔Profile是 1-n 关系而不是 1-1 关系User↔Post是 m-n 关系而不是 1-n 关系- 关系字段大写(例如
User上的Profile和Post) User上的jsonData字段是String类型而不是Json类型User上的role字段是String类型而不是Role类型,enum的角色定义完全缺失
虽然这些不一致之处实际上不会影响您在 Prisma Client API 中可用的“功能集”,但它们会使您失去以前存在的一些约束/保证。
例如,Prisma ORM 现在无法保证 User 最多连接到一个 Profile,因为表之间的关系在内省期间被识别为 1-n,因此一个 User 记录现在可能连接到多个 Profile 记录。
另一个问题是,您可以为 jsonData 和 role 字段存储任何文本,而不管它是否是有效的 JSON 或代表 Role 枚举的值。
要了解有关这些不一致之处的更多信息,请查看模式不兼容性页面。
接下来,我们将逐一解决这些不兼容性,使用 Prisma 模式升级 CLI。
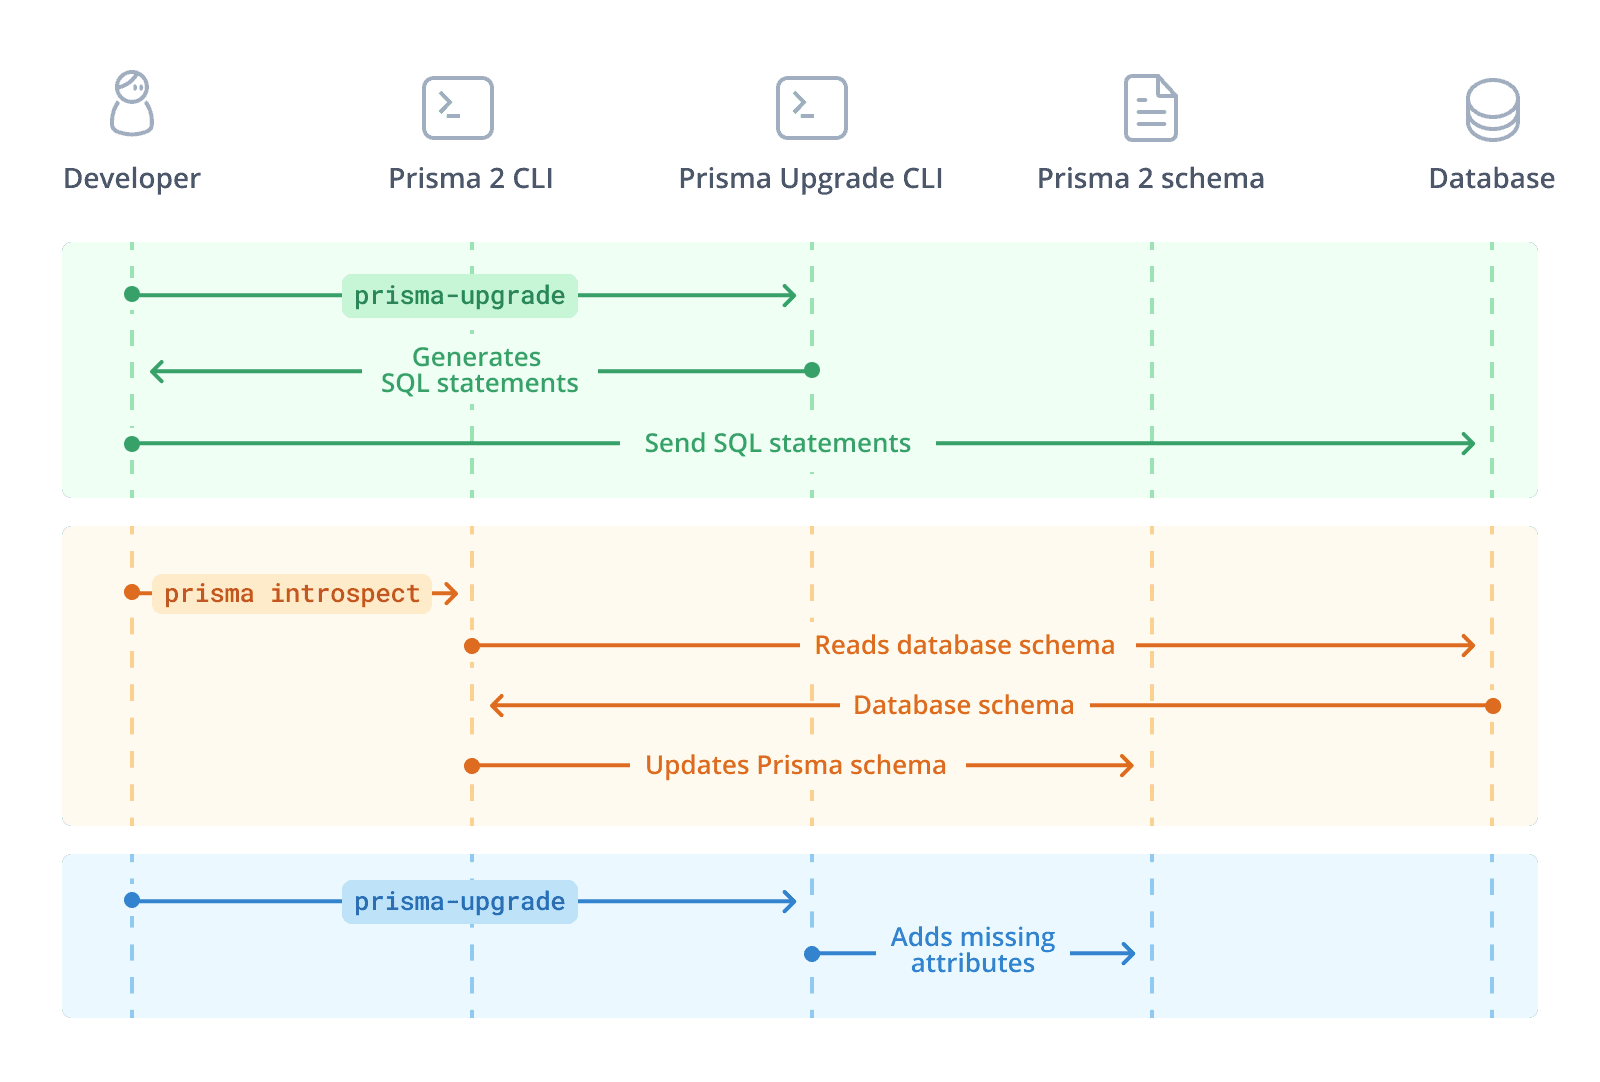
5. 使用 Prisma 模式升级 CLI 解决模式不兼容性
Prisma 1 升级 CLI 是一个交互式工具,可帮助您升级 Prisma 模式并消除上述大多数不一致之处。
Prisma 1 升级 CLI 主要分为两个阶段
- 通过纯 SQL 修复数据库模式
- 向 Prisma ORM 2 模式添加缺失的属性和其他模式修复
在第一阶段,它将生成并打印一些 SQL 语句,您应该对数据库运行这些语句以调整数据库模式。您可以在继续第二阶段之前运行所有语句或其中一部分。
在第二阶段,您无需手动执行任何操作。升级 CLI 将通过添加某些 Prisma ORM 级别属性(如 @default(cuid)) 或 @updatedAt)、调整关系字段名称以匹配 Prisma 1 数据模型中的名称,并确保 Prisma 1 数据模型中两侧都必需的 1-1 关系在 Prisma ORM 2 模式中也必需,从而更改您的 Prisma 模式。
请注意,您可以在过程中的任何时候重新开始,并从第二阶段返回到第一阶段。
在此图中,绿色区域显示第一阶段,蓝色区域显示第二阶段。请注意,您可以在阶段之间选择运行 prisma db pull 来更新您的 Prisma ORM 数据模型
要使用升级 CLI,您可以将其本地安装到项目中,也可以像此处一样使用 npx 一次性调用而无需安装
npx prisma-upgrade prisma1/prisma.yml prisma/schema.prisma
CLI 会向您显示以下消息
◮ Welcome to the interactive Prisma Upgrade CLI that helps with the
upgrade process from Prisma 1 to Prisma ORM 2.

Please read the docs to learn more about the upgrade process:
https://pris.ly/d/how-to-upgrade

➤ Goal
The Upgrade CLI helps you resolve the schema incompatibilities
between Prisma 1 and Prisma ORM 2. Learn more in the docs:
https://pris.ly/d/schema-incompatibilities

➤ How it works
Throughout the process, you'll need to adjust your database schema by sending
SQL statements to it. The SQL statements are provided by the Upgrade CLI.

Note that the Upgrade CLI never makes changes to your database,
you are in full control over any operations that are executed against it.

You can stop and re-run the Upgrade CLI at any time.

These are the different steps of the upgrade process:

  1. The Upgrade CLI generates SQL commands for you to run on your database.
  2. You run the SQL commands against your database.
  3. You run the `npx prisma db pull` command again.
  4. You run the `npx prisma-upgrade` command again.
  5. The Upgrade CLI adjusts the Prisma ORM 2 schema by adding missing attributes.

➤ Note
It is recommended that you make a full backup of your existing data before starting
the upgrade process. If possible, the migration should be performed in a staging
environment before executed against a production environment.

➤ Help
If you have any questions or run into any problems along the way,
please create an issue at:
https://github.com/prisma/prisma1-upgrade/issues/new

Are you ready? [Y/n]
按下 Y 按钮,然后按键盘上的 RETURN 确认以继续。
确认后,CLI 将输出您应该对数据库运行的 SQL 语句
➤ Adjust your database schema
Run the following SQL statements against your database:

  Fix columns with ENUM data types
  https://pris.ly/d/schema-incompatibilities#enums-are-represented-as-text-in-database

    ALTER TABLE `User` CHANGE `role` `role` ENUM('ADMIN', 'CUSTOMER') NOT NULL;


  Add missing `DEFAULT` constraints to the database
  https://pris.ly/d/schema-incompatibilities#default-values-arent-represented-in-database

    ALTER TABLE `User` CHANGE `role` `role` ENUM('ADMIN', 'CUSTOMER') NOT NULL DEFAULT 'CUSTOMER';
    ALTER TABLE `Post` CHANGE `published` `published` TINYINT(1) NOT NULL DEFAULT 0;


  Fix columns with JSON data types
  https://pris.ly/d/schema-incompatibilities#json-type-is-represented-as-text-in-database

    ALTER TABLE `User` CHANGE `jsonData` `jsonData` JSON ;


  Replicate `@createdAt` behavior in Prisma ORM 2.0
  https://pris.ly/d/schema-incompatibilities#createdat-isnt-represented-in-database

    ALTER TABLE `Post` CHANGE `createdAt` `createdAt` DATETIME NOT NULL DEFAULT CURRENT_TIMESTAMP;


  Fix 1-1 relations by adding `UNIQUE` constraints
  https://pris.ly/d/schema-incompatibilities#inline-1-1-relations-are-recognized-as-1-n-missing-unique-constraint

    ALTER TABLE `Profile` ADD UNIQUE (`user`);


  Migrate IDs from varchar(25) to varchar(30)
  https://pris.ly/d/schema-incompatibilities#mismatching-cuid-length

    SET FOREIGN_KEY_CHECKS=0;
    ALTER TABLE `Category` CHANGE `id` `id` char(30) CHARACTER SET utf8 NOT NULL;
    ALTER TABLE `Post` CHANGE `id` `id` char(30) CHARACTER SET utf8 NOT NULL;
    ALTER TABLE `Profile` CHANGE `id` `id` char(30) CHARACTER SET utf8 NOT NULL;
    ALTER TABLE `Profile` CHANGE `user` `user` char(30) CHARACTER SET utf8 ;
    ALTER TABLE `User` CHANGE `id` `id` char(30) CHARACTER SET utf8 NOT NULL;
    SET FOREIGN_KEY_CHECKS=1;

➤ Breaking changes detected

In order to fully optimize your database schema, you'll need to run a few SQL
statements that can break your Prisma 1 setup. Note that these changes are optional
and if you are upgrading gradually and running Prisma 1 and Prisma ORM 2 side-by-side,
you should not perform these changes yet. Instead, you can perform them whenever
you are ready to completely remove Prisma 1 from your project.
If you are upgrading all at once, you can safely perform these changes now.

Learn more in the docs:
https://pris.ly/d/how-to-upgrade'
注意:如果您看到有关重大更改的说明,您可以暂时忽略它。我们稍后会讨论它。
显示的 SQL 语句分为几个“桶”,所有这些都旨在解决特定的模式不兼容性
- 修复 ENUM 数据类型的列
- 向数据库添加缺失的
DEFAULT约束 - 修复 JSON 数据类型的列
- 在 Prisma 2 中复制
@createdAt行为 - 通过添加
UNIQUE约束修复 1-1 关系
下一步,您可以开始向数据库发送 SQL 语句。请注意,所有这些更改都是非破坏性的,您将能够与 Prisma ORM 2 并排继续使用 Prisma 1。
接下来的部分将单独介绍发送到数据库的不同类型的 SQL 语句。
5.1. 通过纯 SQL 修复数据库模式(非破坏性)
在本节中,我们将逐一检查打印的 SQL 语句并对数据库运行它们。
5.1.1. 修复 ENUM 数据类型的列
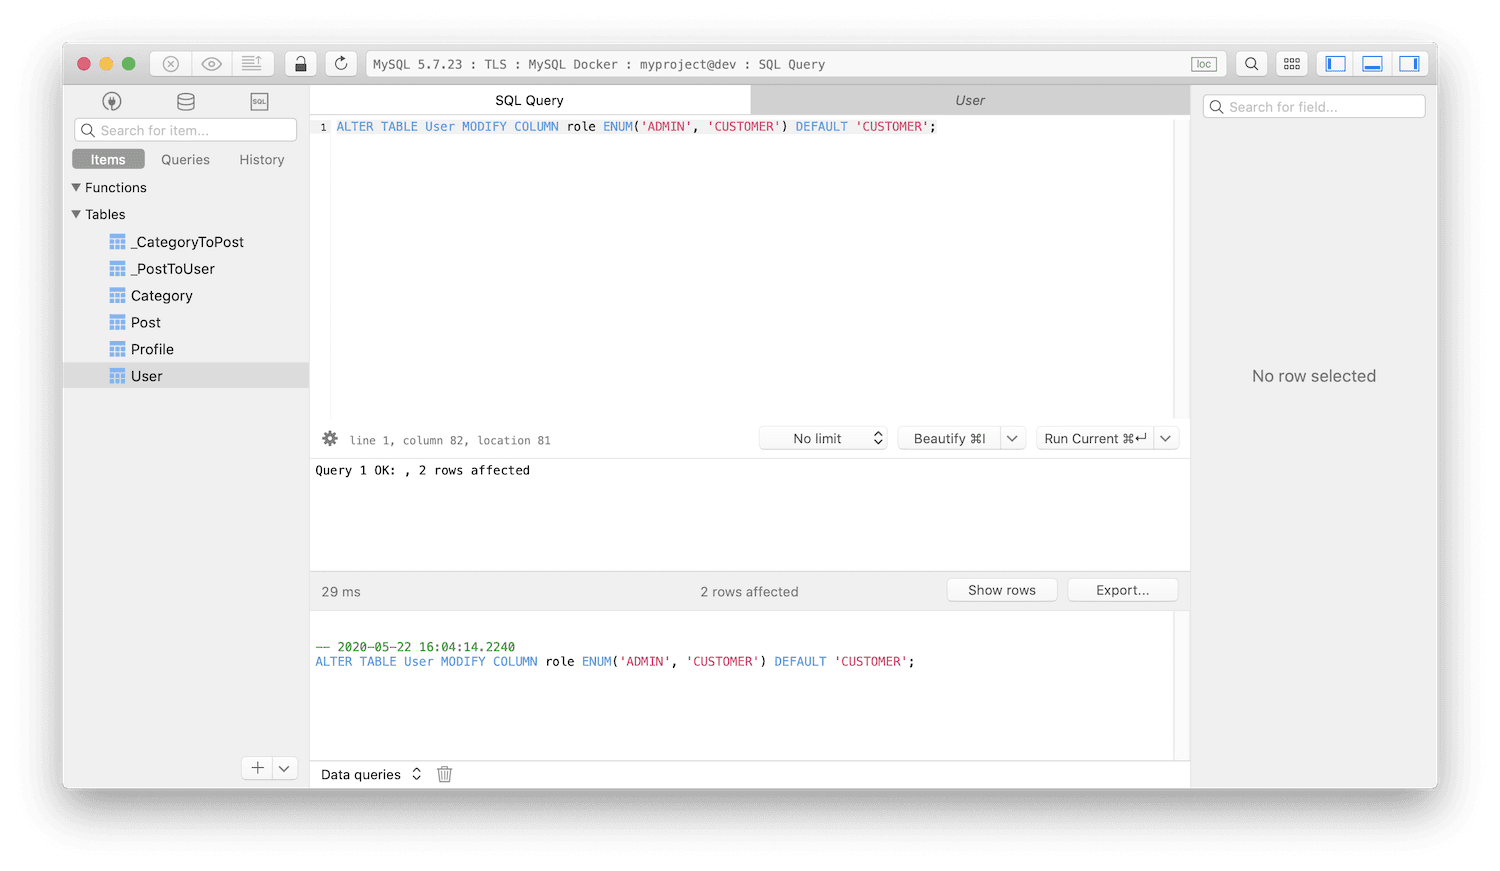
该工具所做的第一件事是帮助您确保 Prisma 1 数据模型中的 enum 定义在底层数据库中表示为实际的 ENUM 类型,目前它们表示为纯字符串(例如 MySQL 中的 MEDIUMTEXT)。
CLI 目前显示以下输出
Fix columns with ENUM data types
https://pris.ly/d/schema-incompatibilities#enums-are-represented-as-text-in-database

  ALTER TABLE `User` CHANGE `role` `role` ENUM('ADMIN', 'CUSTOMER') NOT NULL;
现在继续对数据库运行这些语句。
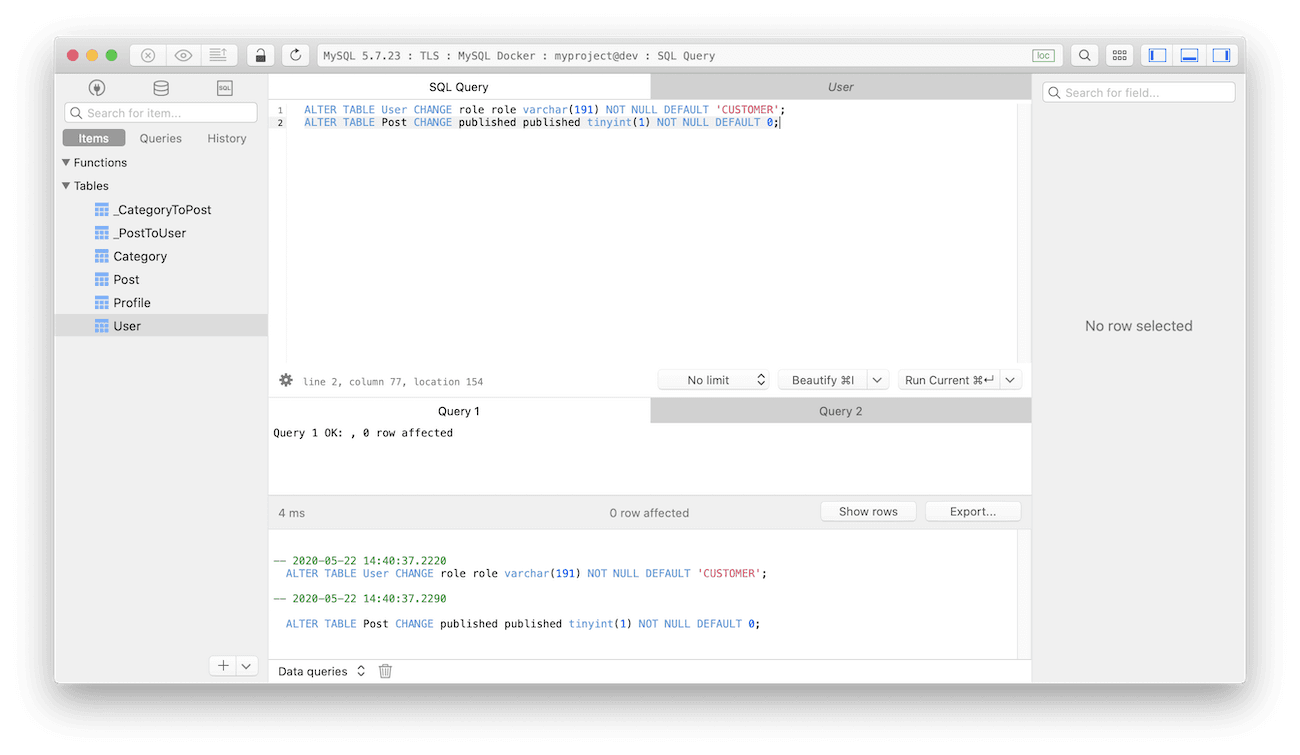
5.1.2. 向数据库添加缺失的 DEFAULT 约束
接下来,升级 CLI 帮助您通过生成直接将相应 DEFAULT 约束添加到数据库的 SQL 语句来解决默认值未在数据库中表示的问题。
在这种情况下,缺少两个由工具建议的 DEFAULT 约束
Add missing `DEFAULT` constraints to the database
https://pris.ly/d/schema-incompatibilities#default-values-arent-represented-in-database

  ALTER TABLE `User` CHANGE `role` `role` ENUM('ADMIN', 'CUSTOMER') NOT NULL DEFAULT 'CUSTOMER';
  ALTER TABLE `Post` CHANGE `published` `published` TINYINT(1) NOT NULL DEFAULT 0;
您现在可以使用命令行客户端或 TablePlus 等 GUI 对数据库运行这些 SQL 语句
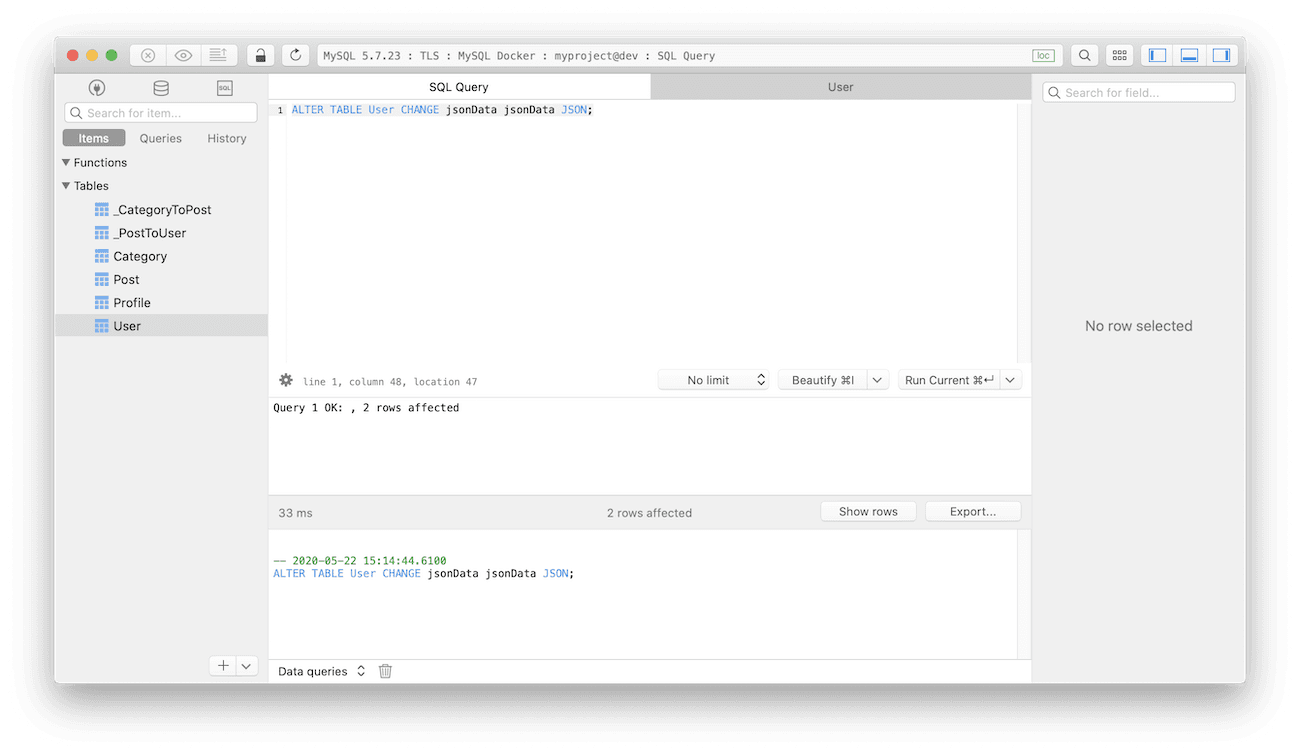
5.1.3. 修复 JSON 数据类型的列
接下来,该工具帮助您确保 Prisma 1 数据模型中的 Json 字段在底层数据库中表示为 JSON 列,目前它们表示为纯字符串(例如 MySQL 中的 MEDIUMTEXT)。
将列类型更改为 JSON 将确保该字段在 Prisma ORM 2 内省期间被正确识别为 Json。
CLI 目前显示以下输出
Fix columns with JSON data types
https://pris.ly/d/schema-incompatibilities#json-type-is-represented-as-text-in-database

  ALTER TABLE `User` CHANGE `jsonData` `jsonData` JSON ;
您现在可以使用命令行客户端或 TablePlus 等 GUI 对数据库运行这些 SQL 语句
5.1.4. 在 Prisma ORM 2 中复制 @createdAt 行为
该工具接下来所做的是帮助您解决@createdAt 行为未在数据库中表示的问题
CLI 目前显示以下输出
Replicate `@createdAt` behavior in Prisma ORM 2.0
https://pris.ly/d/schema-incompatibilities#createdat-isnt-represented-in-database

  ALTER TABLE `Post` CHANGE `createdAt` `createdAt` DATETIME NOT NULL DEFAULT CURRENT_TIMESTAMP;
您现在可以使用命令行客户端或 TablePlus 等 GUI 对数据库运行这些 SQL 语句。
5.1.5. 通过添加 UNIQUE 约束修复 1-1 关系
现在,该工具将通过向数据库中名为 user 的外键列(以 Prisma 1 数据模型中的关系字段命名)添加 UNIQUE 约束来帮助您将 User ↔ Profile 之间的当前 1-n 关系恢复为 1-1 关系。
CLI 目前显示以下输出
Fix 1-1 relations by adding `UNIQUE` constraints
https://pris.ly/d/schema-incompatibilities#inline-1-1-relations-are-recognized-as-1-n-missing-unique-constraint

  ALTER TABLE `Profile` ADD UNIQUE (`user`);
您现在可以使用命令行客户端或 TablePlus 等 GUI 对数据库运行这些 SQL 语句。
5.1.6. 修复 CUID 长度不匹配问题
注意:即使您已更改底层数据库中的列类型,这些 SQL 语句仍将继续出现在升级 CLI 中。这是升级 CLI 当前的限制。
最后,该工具将通过向数据库中名为 user 的外键列(以 Prisma 1 数据模型中的关系字段命名)添加 UNIQUE 约束来帮助您将当前类型为 VARCHAR(25) 的 ID 列更改为 VARCHAR(30)。
CLI 目前显示以下输出
Migrate IDs from varchar(25) to varchar(30)
https://pris.ly/d/schema-incompatibilities#mismatching-cuid-length

SET FOREIGN_KEY_CHECKS=0;
ALTER TABLE `Category` CHANGE `id` `id` char(30) CHARACTER SET utf8 NOT NULL;
ALTER TABLE `Post` CHANGE `id` `id` char(30) CHARACTER SET utf8 NOT NULL;
ALTER TABLE `Profile` CHANGE `id` `id` char(30) CHARACTER SET utf8 NOT NULL;
ALTER TABLE `Profile` CHANGE `user` `user` char(30) CHARACTER SET utf8 ;
ALTER TABLE `User` CHANGE `id` `id` char(30) CHARACTER SET utf8 NOT NULL;
SET FOREIGN_KEY_CHECKS=1;
您现在可以使用命令行客户端或 TablePlus 等 GUI 对数据库运行这些 SQL 语句。
5.1.7. 检测到破坏性更改
如果升级 CLI 打印了关于破坏性更改的注释,您的数据库模式需要进行一些调整,这些调整将破坏 Prisma 1 兼容性以实现完全优化。
如果没有检测到破坏性更改,您可以跳到第 5.2 节
根据您的升级策略,您可以立即执行这些更改,或跳到升级 CLI 的下一阶段
- 如果您正在遵循逐步并行升级策略,请不要立即执行这些更改,因为它们会破坏您的 Prisma 1 设置。在这种情况下,您可以通过键入 n 并按 RETURN 继续升级 CLI 的下一阶段。
- 如果您正在遵循一次性升级策略,您现在可以执行这些更改。在这种情况下,请键入 Y 并按 RETURN 继续。
5.2. 通过纯 SQL 修复数据库模式(破坏性)
在本节中,您将解决破坏 Prisma 1 设置的模式不兼容性。如果您的项目中仍在运行 Prisma 1,请不要执行这些更改!
5.2.1. 修复不正确的 m-n 关系
现在,升级 CLI 帮助您修复 Prisma 1 使用关系表表示的所有 1-1 和 1-n 关系,这些关系在新的 Prisma ORM 2 模式中目前仅存在为 m-n 关系。具体来说,User ↔ Post 关系目前定义为 m-n,但应该是 1-n 关系。
要修复此问题,您需要执行以下迁移
- 在
Post上创建一个新的外键列,直接链接到User表。 - 将外键值从关系表迁移到
Post上的新外键列。 - 删除关系表。
这些说明现在由 CLI 打印
➤ Adjust your database schema
Run the following SQL statements against your database:

  Fix one-to-many table relations
  https://pris.ly/d/schema-incompatibilities#all-non-inline-relations-are-recognized-as-m-n

    ALTER TABLE `Post` ADD COLUMN `authorId` char(25) CHARACTER SET utf8 ;
    ALTER TABLE `Post` ADD CONSTRAINT author FOREIGN KEY (`authorId`) REFERENCES `User`(`id`);
    UPDATE `Post`, `_PostToUser` SET `Post`.`authorId` = `_PostToUser`.B where `_PostToUser`.A = `Post`.`id`;
    DROP TABLE `_PostToUser`;


➤ Next Steps

After you executed one or more of the above SQL statements against your database,
please run the following two commands to refresh your Prisma ORM 2 Schema and check
the changes.

  1. Run `npx prisma db pull` again to refresh your Prisma ORM 2 schema.
  2. Run `npx prisma-upgrade` again.

If you can't or don't want to execute the remaining SQL statements right now, you can
skip to the last step where the Upgrade CLI adds missing attributes to your Prisma ORM 2
schema that are not picked up by introspection.

Skip to the last step? [Y/n]?
对于此修复,您需要运行三条 SQL 语句
- 在
Post表上创建新列authorId。此列应是引用User表的id字段的外键ALTER TABLE `Post` ADD COLUMN `authorId` char(25) CHARACTER SET utf8 ;
ALTER TABLE `Post` ADD CONSTRAINT author FOREIGN KEY (`authorId`) REFERENCES `User`(`id`); - 编写 SQL 查询,读取
_PostToUser关系表中的所有行,并对每行- 通过查找列
A中的值来查找相应的Post记录 - 将列
B中的值作为authorId的值插入到该Post记录中
UPDATE `Post`, `_PostToUser` SET `Post`.`authorId` = `_PostToUser`.B where `_PostToUser`.A = `Post`.`id`; - 通过查找列
- 删除
_PostToUser关系表DROP TABLE `_PostToUser`;
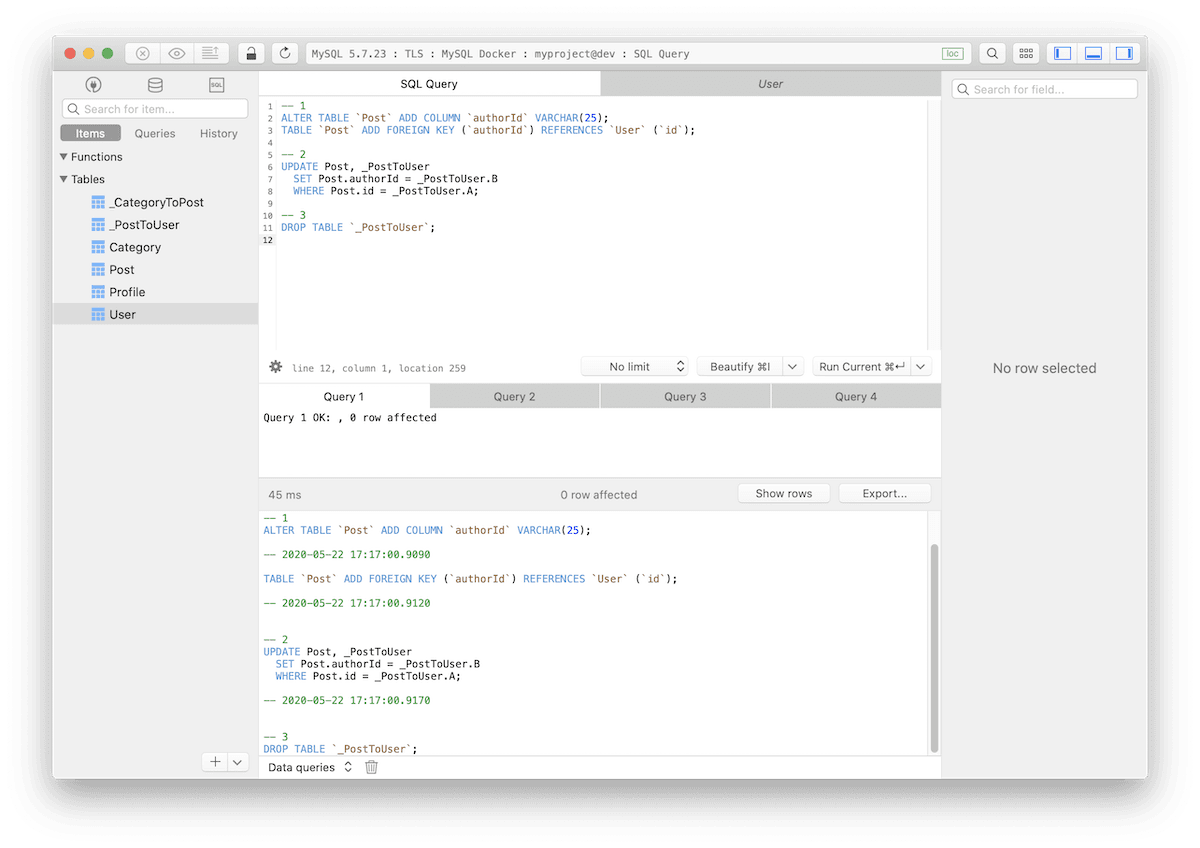
在这些命令之后,关系表的 B 列中的记录的用户 ID 值将迁移到新的 authorId 列中。
5.2. 重新内省数据库以更新您的 Prisma 模式
此时,您已通过升级 CLI 解决了模式不兼容性。您现在可以通过键入 n 并按 RETURN 退出升级 CLI。
在本节中,您将通过另一次内省更新您的 Prisma 模式。这次,由于数据库模式已调整,Prisma 模式之前的缺陷将得到解决
npx prisma db pull
这次,生成的 Prisma 模式如下所示
model User {
  id       String   @id
  name     String
  email    String?  @unique
  jsonData Json?
  role     Role     @default(CUSTOMER)
  Post     Post[]
  Profile  Profile?
}

model Post {
  id        String     @id
  createdAt DateTime   @default(now())
  updatedAt DateTime
  title     String
  content   String?
  published Boolean    @default(false)
  authorId  String?
  User      User?      @relation(fields: [authorId], references: [id])
  Category  Category[] @relation(references: [id])
}

model Category {
  id   String @id
  name String
  Post Post[] @relation(references: [id])
}

model Profile {
  bio  String?
  id   String  @id
  user String? @unique
  User User?   @relation(fields: [user], references: [id])
}

enum Role {
  ADMIN
  CUSTOMER
}
此模式已解决了大多数问题,但仍缺少以下内容
5.2. 向 Prisma 2 模式添加缺失的属性和其他模式修复
CLI 现在打印以下内容
➤ What happens next
As a last step, some final adjustments will be made to your Prisma ORM 2 schema
to carry over some Prisma ORM-level attributes that aren't picked up by introspection.

As a last step, some final adjustments will be made to your Prisma ORM 2.0
schema to carry over some Prisma ORM-level attributes that aren't picked
up by introspection.

Warning
Your current Prisma ORM 2.0 schema will be overwritten, so please
make sure you have a backup!

Are you ready? [Y/n]
此时,您要么运行了 CLI 打印的所有 SQL 语句,要么跳过了一些。无论哪种情况,您现在都可以进入最后一步,让升级 CLI 添加缺失的 Prisma ORM 2 属性。通常这些是以下内容
- 您的
@id字段的@default(cuid()) - Prisma 1 中使用此属性的任何字段的
@updatedAt @map和@@map作为 Prisma 1 中@db和@@db的替代
在该步骤中,升级 CLI 还修复了过渡到 Prisma ORM 2 时发生的其他问题
- 它确保 Prisma 1 中两侧都必需的 1-1 关系在您的 Prisma ORM 2 模式中也必需
- 它将关系字段重命名为与 Prisma 1 数据模型中相同的名称(即将推出)
要应用这些更改,您可以重新运行升级 CLI
npx prisma-upgrade prisma1/prisma.yml prisma/schema.prisma
如果您没有解决所有模式不兼容性,升级 CLI 现在会打印剩余的 SQL 语句(以及用于迁移 ID 的语句)。此时您可以忽略它们,并通过在提示时连续键入 Y 并按 RETURN 继续到最后一步。
如果您解决了所有模式不兼容性,将不会打印 SQL 语句,并且升级 CLI 只会输出以下内容
$ npx prisma-upgrade prisma1/prisma.yml prisma/schema.prisma

➤ Next Steps

After you executed one or more of the previous SQL statements against your database,
please run the following two commands to refresh your Prisma ORM 2 schema and check
the changes.

  1. Run `npx prisma db pull` again to refresh your Prisma ORM 2 schema.
  2. Run `npx prisma-upgrade` again.

If you can't or don't want to execute the remaining SQL statements right now, you can
skip to the last step where the Upgrade CLI adds missing attributes to your Prisma ORM 2
schema that are not picked up by introspection.

Skip to the last step? [Y/n]?
再次键入 Y 并按 RETURN 确认。
升级 CLI 的最终提示现在要求您确认它将对您的 Prisma 模式进行的上述更改
➤ What happens next
As a last step, some final adjustments will be made to your Prisma ORM 2 schema
to carry over some Prisma ORM-level attributes that aren't picked up by introspection.

As a last step, some final adjustments will be made to your Prisma ORM 2.0
schema to carry over some Prisma ORM-level attributes that aren't picked
up by introspection.

Warning
Your current Prisma ORM 2.0 schema will be overwritten, so please
make sure you have a backup!

Are you ready? [Y/n]
最后一次,键入 Y 并按 RETURN 确认。
这是升级 CLI 的最终输出
Updating prisma/schema.prisma...
Done updating prisma/schema.prisma!

✔ Congratulations, you're all set!

➤ Note
If you didn't execute all generated SQL commands against your database,
you can re-run the Upgrade CLI at any time.

Note that the Upgrade CLI doesn't resolve all of the schema incompatibilities
between Prisma 1 and Prisma ORM 2. If you want to resolve the remaining ones,
you can do so manually by following this guide:
https://pris.ly/d/upgrading-the-prisma-layer

➤ Next steps
Otherwise you can continue your upgrade process by installing Prisma Client 2:
npm install @prisma/client

You can find guides for different upgrade scenarios in the docs:
https://pris.ly/d/upgrade-from-prisma-1
5.3. 最终结果
Prisma 模式的最终版本应如下所示
model User {
  id       String   @id @default(cuid())
  name     String
  email    String?  @unique
  jsonData Json?
  role     Role     @default(CUSTOMER)
  Post     Post[]
  Profile  Profile?
}

model Post {
  id        String     @id @default(cuid())
  createdAt DateTime   @default(now())
  updatedAt DateTime   @updatedAt
  title     String
  content   String?
  published Boolean    @default(false)
  authorId  String?
  User      User?      @relation(fields: [authorId], references: [id])
  Category  Category[] @relation(references: [id])
}

model Profile {
  id   String  @id @default(cuid())
  bio  String?
  user String? @unique
  User User?   @relation(fields: [user], references: [id])
}

model Category {
  id   String @id @default(cuid())
  name String
  Post Post[] @relation(references: [id])
}

enum Role {
  ADMIN
  CUSTOMER
}
5.4. 重命名关系字段
您会注意到此版本的 Prisma ORM 2 模式的一件事是,所有关系字段都以其各自的模型命名,例如
model User {
  Post    Post[]
  Profile Profile?
}

model Post {
  User     User?      @relation(fields: [authorId], references: [id])
  Category Category[] @relation(references: [id])
}

model Profile {
  User User? @relation(fields: [user], references: [id])
}

model Category {
  Post Post[] @relation(references: [id])
}
这并不理想,您实际上可以手动将它们全部重命名回以前的版本!
因为所有关系字段都是虚拟的,这意味着它们不会在数据库中显现,所以您可以随意命名它们。在这种情况下,所有关系字段都小写,有时是复数形式。
这是重命名后的样子
model User {
  posts   Post[]
  profile Profile?
}

model Post {
  author     User?      @relation(fields: [authorId], references: [id])
  categories Category[] @relation(references: [id])
}

model Profile {
  user  String? @unique
  owner User?   @relation(fields: [user], references: [id])
}

model Category {
  posts Post[] @relation(references: [id])
}
注意:对于
User和Profile之间的 1-1 关系,无法将关系字段设置为旧名称user。这是因为与已经存在的保存外键的关系标量字段存在命名冲突。在这种情况下,您可以选择不同的名称,或者通过 SQL 直接在数据库中重命名外键列。
5.5. 解决剩余的模式不兼容性
有一些模式不兼容性尚未通过升级 CLI 解决。此时您仍未修复标量列表。您可以在模式不兼容性页面上找到此问题和其他问题的建议解决方案。
6. 安装并生成 Prisma Client
现在您已经准备好 Prisma ORM 2 模式,您可以使用以下命令安装 Prisma Client
npm install @prisma/client
7. 后续步骤
恭喜,您现在已将 Prisma ORM 层升级到 Prisma ORM 2!从这里开始,您可以继续使用以下指南之一更新您的应用程序代码
- 旧版到新版 Nexus:如果您当前正在使用 Prisma 1 和 GraphQL Nexus,请选择此指南。
- prisma-binding 到 Nexus:如果您当前正在使用 Prisma 1 和
prisma-binding,并希望升级到 Nexus(和 TypeScript),请选择此指南。 - prisma-binding 到 SDL-first:如果您当前正在使用 Prisma 1 和
prisma-binding,并希望升级到 SDL-first GraphQL 服务器,请选择此指南。 - REST API:如果您当前正在使用 Prisma Client 1 和 Prisma 1 并构建 REST API,请选择此指南。
奖励:Prisma Client API 比较
本节包含 Prisma 1 和 Prisma ORM 2 的 Prisma Client API 的高级并排比较。有关新 Prisma Client API 的更多详细信息,您可以查阅 Prisma Client 文档。
读取单个记录
const user = await prisma.user({ id: 1 })
await prisma.user.findUnique({
  where: { id: 1 },
})
读取记录列表
const user = await prisma.users()
await prisma.user.findMany()
过滤列表
const users = await prisma.users({
  where: {
    name: 'Alice',
  },
})
await prisma.user.findMany({
  where: {
    name: 'Alice',
  },
})
分页列表
const posts = await prisma.posts({
  skip: 5,
  first: 10,
})
await prisma.user.findMany({
  skip: 5,
  take: 10,
})
排序列表
await prisma.posts({
  orderBy: 'title_ASC',
})
await prisma.posts({
  orderBy: {
    title: 'asc',
  },
})
创建记录
await prisma.createUser({
  name: 'Alice',
})
await prisma.user.create({
  data: {
    name: 'Alice',
  },
})
更新记录
await prisma.updateUser({
  where: { id: 1 },
  data: {
    name: 'James',
    email: 'james@prisma.io',
  },
})
await prisma.user.update({
  where: { id: 1 },
  data: {
    name: 'James',
    email: 'james@prisma.io',
  },
})
删除记录
await prisma.deleteUser({ id: 1 })
await prisma.user.delete({
  where: { id: 1 },
})
选择字段和加载关系
在 Prisma 1 中,选择特定字段和/或加载对象关系的唯一方法是使用基于字符串的 $fragment 和 $graphql 函数。在 Prisma ORM 2 中,现在使用 select 和 include 以干净且类型安全的方式完成。
这种方法的另一个好处是您可以在任何 Prisma Client 查询(例如 findUnique、findMany、create、update、delete 等)上使用 select 和 include。
await prisma.user({ id: 1 }).$fragment(`
  fragment NameAndEmail on User { id email }`
`)
await prisma.user.findUnique({
  where: { id: 1 },
  select: {
    id: true,
    email: true,
  },
})
例如,在 Prisma 1 中,创建新记录并仅检索返回对象中的 id 是不可能的。使用 Prisma ORM 2,您可以如下实现这一点
await prisma.user.create({
  data: {
    name: 'Alice',
  },
  select: {
    id: true,
  },
})